Adding patches to your nylon backpack is a fantastic way to personalize your style and express your unique personality. Whether you're a fan of embroidery, badges, or DIY projects, customizing your backpack can make it stand out from the crowd. In this guide, we will walk you through the steps to attach patches to your nylon backpack in a durable and stylish manner.
Personalizing your gear has become a global trend, and nylon backpacks are one of the most popular choices for customization. Nylon material is durable, lightweight, and easy to work with, making it perfect for patch attachment. From adventure seekers to fashion enthusiasts, everyone can benefit from learning how to put patches on a nylon backpack.
Throughout this article, we will explore the tools, techniques, and tips you need to create a backpack that reflects your individuality. Whether you're a beginner or an experienced crafter, this guide will provide step-by-step instructions to help you achieve professional results. Let’s dive in!
Read also:Janelle Monaacutees Husband Unveiling Her Love Life And Personal Journey
Table of Contents
- Introduction to Patch Customization
- Tools and Materials You Need
- Different Methods to Attach Patches
- Iron-On Patches: Step-by-Step Guide
- Sewing Patches by Hand
- Using Fabric Glue for Quick Fixes
- Tips for Choosing the Right Patches
- Maintaining Your Customized Backpack
- Frequently Asked Questions
- Conclusion and Call to Action
Introduction to Patch Customization
Customizing your belongings is a fun and creative way to express yourself, and nylon backpacks are no exception. Patch customization allows you to add flair, tell stories, or showcase your interests. Nylon, with its smooth and sturdy surface, is an ideal material for attaching patches, ensuring they stay securely in place even during rigorous use.
In this section, we will discuss the benefits of using patches on nylon backpacks, the versatility they offer, and why this trend has gained popularity among backpack enthusiasts. Whether you're looking to add a military-inspired design, travel souvenirs, or quirky motifs, patches can transform your backpack into a unique piece of art.
Tools and Materials You Need
Gathering the Essentials
Before you begin the patch attachment process, it's essential to gather all the necessary tools and materials. Here’s a list of items you’ll need:
- Iron-on patches or sewable patches
- A sewing needle and thread (matching the patch color)
- Fabric glue (optional)
- An iron and ironing board
- Scissors
- Pins for holding patches in place
Having the right tools ensures that your customization process is smooth and efficient. Additionally, investing in high-quality patches will enhance the longevity and appearance of your backpack.
Different Methods to Attach Patches
Understanding the Options
There are several methods to attach patches to your nylon backpack, each with its own advantages. The method you choose will depend on your skill level, the type of patch, and the desired durability. Below, we will explore the most common techniques:
Iron-On Method
The iron-on method is quick and straightforward, making it ideal for beginners. This technique works best with patches specifically designed for iron-on application. Simply place the patch in the desired location, cover it with a thin cloth, and apply heat with an iron.
Read also:Dominique Mcelligott Husband Name A Comprehensive Guide To Her Personal Life And Career
Sewing Method
Sewing patches onto your backpack provides a more secure attachment, especially for heavy-duty use. This method is slightly more time-consuming but yields professional results. Using a needle and thread, you can hand-stitch the patch or use a sewing machine for faster results.
Fabric Glue Method
Fabric glue offers a no-sew option for attaching patches. While it's not as durable as sewing, it’s perfect for temporary or decorative purposes. Simply apply a small amount of glue to the back of the patch and press it onto the backpack surface.
Iron-On Patches: Step-by-Step Guide
Iron-on patches are a popular choice due to their ease of application. Follow these steps to attach an iron-on patch to your nylon backpack:
- Choose the location on your backpack where you want to place the patch.
- Position the patch carefully, ensuring it’s aligned correctly.
- Set your iron to the appropriate heat setting (usually medium-high).
- Place a thin cloth over the patch to protect it from direct heat.
- Press the iron firmly onto the patch for 20-30 seconds, applying even pressure.
- Allow the patch to cool completely before handling.
Iron-on patches are perfect for beginners who want to achieve professional results without much effort. However, ensure the patch is designed for nylon material to prevent damage during the application process.
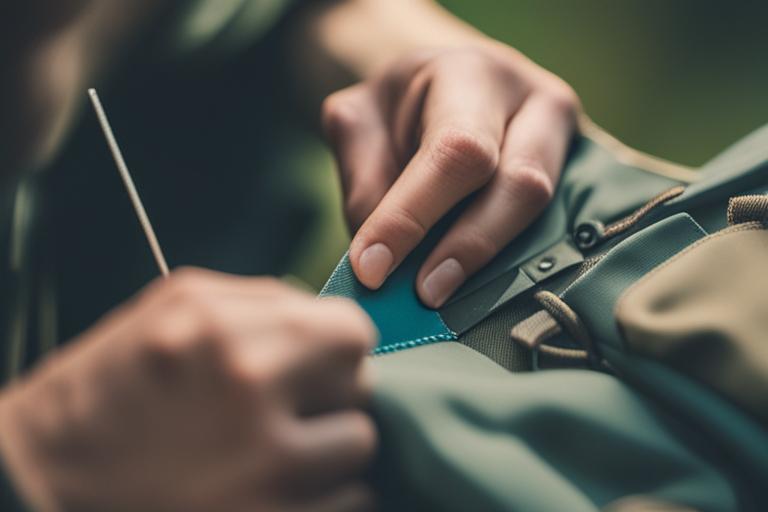
Sewing Patches by Hand
Hand-Stitching Techniques
Sewing patches onto your nylon backpack adds a personal touch and ensures they stay securely in place. Here’s how you can sew a patch by hand:
- Pin the patch to the desired location on your backpack.
- Thread your needle with a color that matches the patch or backpack material.
- Use a basic whipstitch or backstitch to sew around the edges of the patch.
- Knot the thread securely after completing the stitching.
Hand-stitching is a timeless technique that offers unparalleled durability. It’s ideal for patches that will endure frequent use or exposure to harsh conditions.
Using Fabric Glue for Quick Fixes
Fabric glue provides a quick and easy solution for attaching patches to your nylon backpack. While it’s not as durable as sewing, it’s perfect for temporary designs or lightweight patches. Here’s how to use fabric glue effectively:
- Clean the area on your backpack where you plan to attach the patch.
- Apply a small amount of fabric glue to the back of the patch.
- Press the patch firmly onto the backpack and hold it in place for a few seconds.
- Allow the glue to dry completely before handling the backpack.
For best results, choose a fabric glue specifically designed for use on nylon materials. This ensures a strong bond and prevents damage to the backpack surface.
Tips for Choosing the Right Patches
Selecting High-Quality Patches
When choosing patches for your nylon backpack, consider the following factors:
- Material: Opt for patches made from durable materials such as polyester or cotton to ensure longevity.
- Design: Select designs that reflect your personality or interests, whether it’s travel, music, or hobbies.
- Size: Choose patches that complement the size and style of your backpack without overwhelming it.
- Attachment Method: Decide whether you want iron-on, sewable, or adhesive patches based on your skill level and preferences.
Investing in high-quality patches not only enhances the appearance of your backpack but also ensures they remain intact through regular use.
Maintaining Your Customized Backpack
Caring for Your Patched Backpack
To ensure your customized nylon backpack remains in top condition, follow these maintenance tips:
- Avoid exposing the patches to excessive heat or moisture, which can weaken the attachment.
- Hand wash your backpack instead of using a washing machine to prevent damage to the patches.
- Regularly inspect the patches for signs of wear and reinforce them if necessary.
With proper care, your customized backpack can remain a stylish and functional accessory for years to come.
Frequently Asked Questions
Can I use any type of patch on a nylon backpack?
While most patches can be attached to nylon backpacks, it’s important to choose patches designed for use on synthetic materials. Iron-on patches, for example, should be specifically labeled as suitable for nylon to avoid melting or damage.
Will sewing damage my backpack?
Sewing patches onto a nylon backpack is safe as long as you use the appropriate needle and thread. A sharp needle and strong thread will ensure a secure attachment without compromising the integrity of the material.
How long do iron-on patches last on nylon?
The longevity of iron-on patches depends on factors such as usage, exposure to heat, and proper application. With proper care, they can last several months to a year before needing reinforcement.
Conclusion and Call to Action
Customizing your nylon backpack with patches is a fun and creative way to make a personal statement. Whether you choose to sew, iron-on, or glue your patches, following the steps outlined in this guide will help you achieve professional results. Remember to select high-quality patches and maintain your backpack properly to ensure long-lasting customization.
We encourage you to share your customized backpack photos in the comments below or on social media. Your feedback and experiences can inspire others to embark on their own customization journey. For more tips and tutorials, explore our other articles and stay tuned for new content!